
How to Scan Toe-Toed Sloth Skull
- EUNJUNG PARK
- Dec 13, 2022
- 6 min read

A museum at University of Dundee is an institution where cares for and displays a collection of animal specimens. Especially dental school collections are full of amazing animal skulls and teeth. It is nice to display inside of University of Dundee dental school however, it would be nicer to present the collections to publics in worldwide.
Since September 2022, I am participating in Museum Service Internship for 3D scanning the museum collections to create educational materials such as animations and digital 3D models. There are so many interesting collections in the museum. One specimen caught my and Mattew's (Curator of Museum CollectionsCulture and Information, University of Dundee) eyes, it was Toe-toed sloth skull. It has black 18 teeth with distinguish shape. We thought a digital copy of the specimen would be of great value to science and education as it would arouse the curiosity of students studying comparative anatomy.
How to scan and share the data on a platform

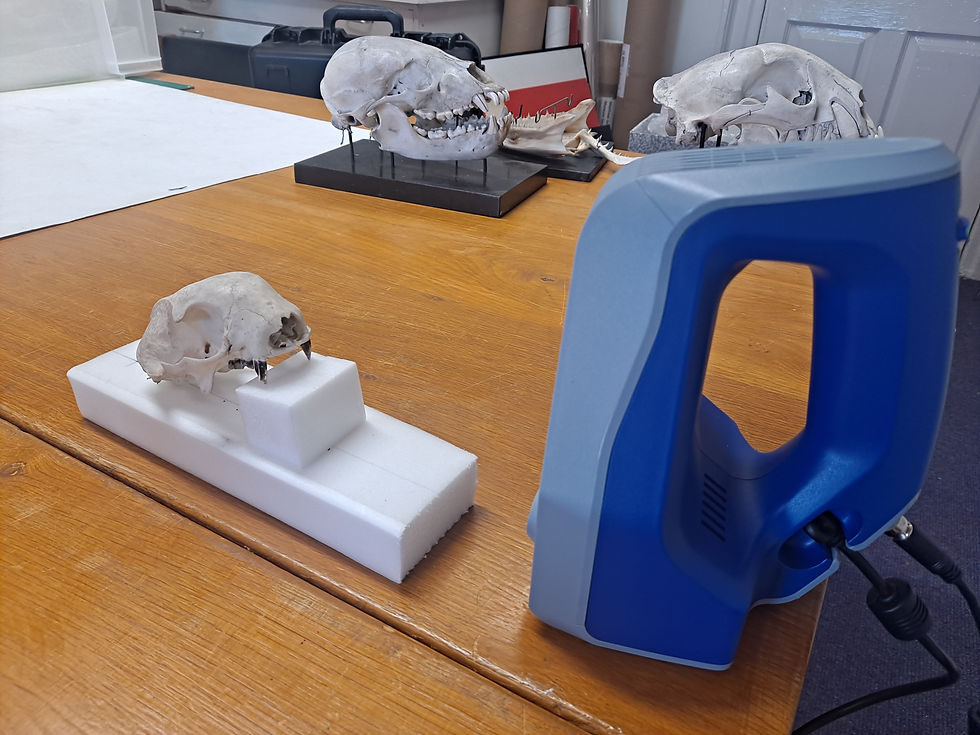
As scanning technology has improved, it has become easier for the Museum to capture and share detailed digital renders of specimens. Artec Eva and spider scanner uses a combination of projected light patterns and cameras to record objects and surfaces. 3D polygonal models can be reconstructed by triangulation, multiple scans. Artec Eva scanner is suit for a bigger object such as a human bust, an alloy wheel, or a motorcycle exhaust system. Artec Spider scanner is perfect for capturing small objects or intricate details of large industrial objects in high resolution.
Scan the specimen’s surface and edit on Artec Studio


The toe-toed sloth’s mandible is about 10 cm, so I decided to use Artec Space Spider scanner. Scanning started with press Preview button or push the scanner button up to launch preview mode. After I checked everything is working and get good distance for scanning, pressed Record button or push the scanner button up again to start record to surface scan. I done a couple of scans of the specimen from different angles to get everything covered.


When I am happy with the result of the scan, I need to erase unnecessary parts such as a panel and sticks which are for supporting the specimen. For a better view of the individual scans, I changed the scan colour from texture (View > Colour > Scan colour). The software has several options for erasing, I prefer lasso selection for deleting larger space, and 2D selection for deleting small and detailed polygons


I selected scans and went over to Align tap on the left. The blue scan shows a register and the green one shows unregistered. While holding down the Shift key on a keyboard, I move and rotate the unregistered scan into a similar position to the registered scan. I can see plenty of overlap on both scans I pressed Auto-alignment. It worked so the unregistered scan tuned into the registered scan and the colour of the scan turned blue. I can see some holes which represent an unscanned surface, so I went back to Scan tap for an additional scan. I repeated this process until I can see the last hole on the scans


After I tried to cover as much as possible, I went to Tools and applied for Fine registration which will increase the quality of each scan by adjusting individual frame positions. Also applied Global registration to optimize the frames within scans. I can saw the value of Error decreased which means the accuracy of scans improved. I clicked the Outliner removal button which removes small floating artefacts that are left.


I need to fuse the scans into a single object. Since the specimen has a lot of sharp details and teeth. The resolution should match that of the worst scan. The lower number of Err the higher degree of accuracy. On this project 0.5 is the lowest degree of accuracy another word the worst scan. The fill hole option changed to watertight which is useful when the scans have only small holes to be filled. However, I can find tiny holes which should not be there, so I rescan and rearrange scans.


This time the fused object turned out well and I was happy with that.


When I see the detail of the object, I can see spikes that did not delete on Outlier removal. I went back to Editor > Eraser to delete those polygons. This time I used the 2D selection option for detailed work. On Tools, I can fill the holes with Hole filling. To optimize the file size, I did Mesh simplification. It reduced polycount and file size for more effective editing afterward.


Now the object is ready to add colour texture. I came down to the Texture tap on the left and selected the scans that I used to apply colour texture. Since the size of the specimen is small so I reduced the output texture size from 2048 X 2048 to 1024 X 1024. After I pressed Apply button and adjust the degree of hue and brightness, I finally exported the object into obj. file.
Arrange the skull cap object and the mandible object and edit the texture map
Blender is a free and open-source 3D computer graphics software toolset used for creating various 3D digital artworks, for example, animation, 3D models, visual effects, and so on. The performance of blender is getting improved and recently many 3D artists loved to create their 3D artworks with the software. I also love to use this software because it has an intuitive interface design and powerful performance. I can broaden my expression with Blender.


I imported the obj. files of the skull cap and mandible of the Toe-toed sloth. Changed the position and size of each object and turn on and changed viewport shadowing into Material preview. I increased roughness which is in Material properties.


The object looked good but the texture map did not fully cover some areas. It would be preferable not to have these so the model looks more realistic on a digital screen. I opened the texture map on Photoshop and edit the area where need to be recovered. I used the Stamp tool so I can keep the texture of the specimen when I cover the white part. I exported the texture map and went back to Blender.


On Shading workspace, I imported new texture map image.


I repeated the texture map recovering process on mandible object. This time I used texture painting tool on Texture painting workspace to mark the parts should I recover on the texture map.

Create an animation


Before starting to create an animation, I changed the pivot point of the mandible from the centre of the object to the condylar process. To move the origin of the object I put a 3D cursor on a condylar process and change the Set of Origin (Object > Set Origin > Origin to 3D cursor).


After I checked the mandible rotated correctly, I moved to the animation workspace. I set the start frame as 0 and the end frame as 60. Put a time indicator on 0 frame and press the I key on a keyboard to add a rotation keyframe. Put the time indicator on 30 frames and lower the mandible and add a keyframe. I copied and pasted keyframes on 0 frame to 60 frames so the object looks like medicating continuously.
Upload the objects with animation on Sketchfab
Sketchfab is a 3D modelling platform website to publish, share and buy 3D content.


First, upload the blender file so the mastication animation will show on Sketchfab and input the title and information of the specimen. Once I saved properties, I started to edit 3D settings.


I can add a texture map on the Materials property. For more realistic texture expression, I made a bump map in photoshop and applied it to Sketchfab.


A bump map is one kind of texture map technique for simulating bumps and wrinkles on the surface of an object. I duplicated the texture maps and make them monotonous with dramatic contrast. For constant expression, I used the action tool on photoshop so the same contrast can be applied on each bump map.


I choose the final position and click save the view to save the preview that people will see while browsing. I select the action option under the timeline and select animation so that when people click to see the model will automatically start the medication animation. I selected the environment light setting and adjust the degree of brightness and light intensity.

When complete, the two-toed sloth model uploaded on University of Dundee Sketchfab.
You can see the 3D model on here. We’d love to hear from you if you download or print our models, especially if you use them in education and outreach.
Comments